Thursday, January 5, 2012

Peer Block: Block Unwanted IP’s and Connections

1

Your computer talks with the other computers when you connect to the internet. Your computer sometimes talks with good computers. Unfortunately, your computer also talks with some bad computers. For example, spyware servers, anti P2P organizations’ servers or computers follow up your downloading activities, some hacked computers, or some governments’ computers monitoring your all activities on the internet try to access your computer to get more information about your activities. It is terrible that your computer talks with those unwanted computers, and sends what they want.

We will get rid of those unwanted connections by using Peer Block. To download the program, please click here. It is very simple and useful security tool. I will explain how to use Peer Block systematically. If you are not an advanced user, first and second steps are enough for you.


Installation

When you finish setup, you will see some setting screens given below.
peer-block-first-settings

peer-block-update-settings

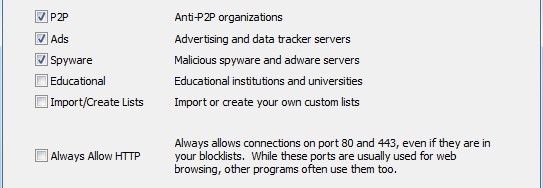
I don’t keep Educational box checked, if you need to block those connections, you could click it. If you already have a block list, you could click Import/Create List box, and install your block list. To keep it unchecked is recommended, because, Peer Block has own list to block those connections. It is also recommended to keep Always Allow HTTP box. After we finish those settings, we click next. We will see second picture given above that make us able to setup updating parameters. We could click everyday, Peer Block and Lists boxes. After we click next, Peer Block will update itself and finish setup.


User Interface

We could see Peer Block’s basic interface. As soon as possible Peer Block runs, we could see some IP’s try to access our computers. If you right click one of the items as seen in the picture, you could adjust permission for this IP’s. Although it is not recommended, sometimes the program blocks to access whole website. In this case, we could choose options given in the picture or disable Peer Block until we leave the website. For example, to access BBC’s website is totally blocked. It is better to choose allow 15 minutes to access to the website.


Adding and Updating Lists

Peer Block already provides block lists. If you click List Manager, you could see list of blocked connections. You could see current lists, import our own list or add new block lists from iblocklist. New or updated lists could be downloaded from iblocklist.

If you click Add button, you could see existing lists. If you copy links from iblocklist, you could paste it to add URL section of List Manager. If you wish, you could add explanations as well. After you paste new block lists, you could press OK button. Your new list will be added and updated by Peer Block when it needs. You could see some examples from iblocklist. If you are not an advanced user, it is better to use Peer Block’s own block lists.


Activity Logs and History

Peer Block is able to keep activity history. You could see all blocked and allowed IP numbers or search for specific items according to IP number, organization, source, and protocol.

If you click Settings tab, you could adjust your log file. After you set log settings, click next. You could adjust your own settings to use Peer Block efficiently. I didn’t change log settings, but I adjusted other settings according to picture given below.

Finally, Peer Block is very simple and useful tool for your safety. It will keep you safe from unwanted connections. Keep the program in your boot, if you share files on torrent or similar P2P programs. Although it doesn’t mean 100% security, it will block many of risks and connections monitoring your computer.

Bye for now!


Read more

IObit Uninstaller: Uninstall Programs and its Leftovers

1

iobit-uninstaller-booting-softwareDo you use Windows’ own uninstaller to remove a program from your computer? If your answer is yes, you also have some problems that you could get rid of uninstalled program fully. Although you uninstall programs, they still keep some leftovers like files, folders or registry entries on your computer. You also have problems with unwanted toolbars as well. There are some tools to remove programs from your computer completely. You could use IObit Uninstaller to get rid of all uninstalled programs entries, tracks and leftovers on your computer.
Similar Programs

I have tried Your Uninstaller and Revo Uninstaller before I use IObit Uninstaller. Both of those programs have free and paid versions, and it drives me to find a free alternative. I also had some problems that those programs couldn’t remove all entries although they say entries were removed. Actually I also had some system problems because of using those two programs. Although IObit Uninstaller also have some problems like couldn’t delete some entries, I didn’t have any system problems. And, its deletion problems are very less.

Download and Setup Program

You could download IObit Uninstaller here. You don’t need to install the program. It is only 1.57 megabytes, click and use program. You also could use it as portable program. The program is really small, simple, and useful tool to boost your computer.

User Interface

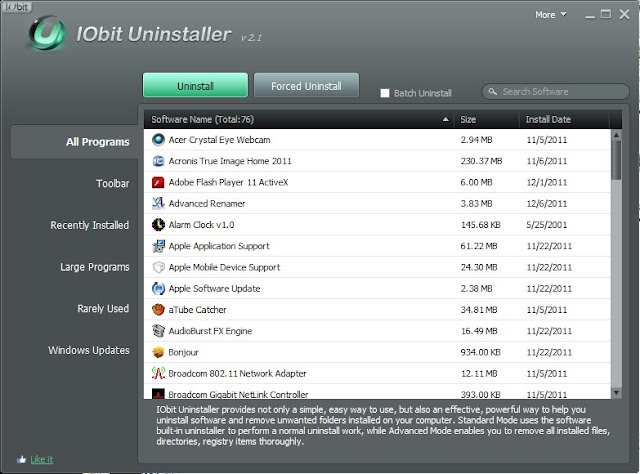
The program has a simple interface to find programs to uninstall. You could see all programs installed on your computer, toolbars that all of us had problems with those unwanted toolbars; recently installed programs, large programs that require more disk space, rarely used programs, and Windows Updates could be seen in different vertical tabs. The most important feature of the program is we could uninstall Windows Updates. If you don’t want to have some updates, you could uninstall it.

iobit-uninstaller-user-interface

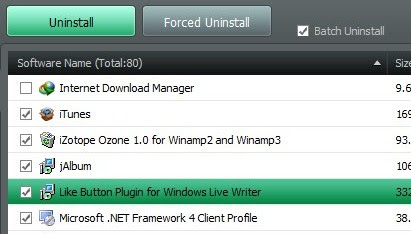
You could see all programs on your computer and you may want to uninstall more programs. If you click Batch Uninstall, you could choose more than one program by clicking boxes, and uninstall them by only one click.

iobit-uninstaller-batch-uninstall-opitons

Standard Uninstall

We choose the program we want to uninstall and click Uninstall button to remove program and its leftovers from the system. There are three stages to uninstall.

iobit-uninstaller-standard-uninstall

System Restore: IObit Uninstaller creates a system restore point before uninstall programs.

Standard Uninstall: Program and files in install directory are deleted like Windows’ own uninstaller.

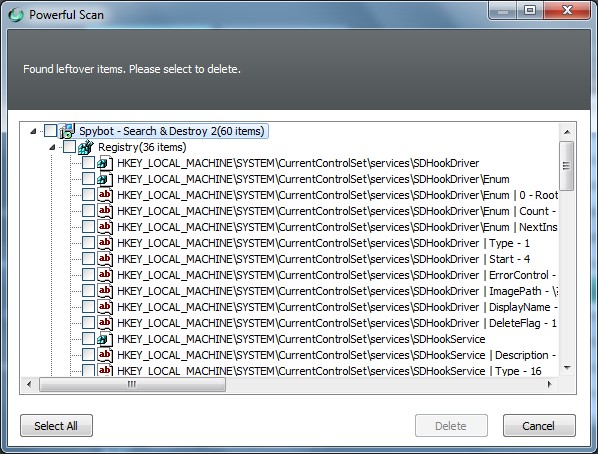
Powerful Scan: After standard uninstall, we could click Powerful Scan and select entries and leftovers we want to remove. If you don’t want to keep anything on your computer about uninstalled program, you could select all. After you press delete, all items will be deleted and operations will be finished.

iobit-uninstaller-powerful-scan

Forced Uninstall

Sometimes programs could reject your uninstalling request. If you encounter this kind of refusal, you could use Forced Uninstall option.

Search program you want to uninstall or specify program’s installation directory on Forced Uninstall Screen.

iobit-uninstaller-forced-uninstall

After you find and select the program, you could press next. IObit Uninstaller will do the same actions as Standard Uninstall and remove all leftovers of program refuse to be uninstalled.

Logs

When you click More button, you could see some extra options like language selection, logging options, about and help.

If you click Export Application List, it will create the list of your programs. You could see one of the list items on the list.

iobit-uninstaller-program-logs

If you click Log Manager, you could see IObit Uninstaller’s activities like uninstalled programs, deleted registry entries. If you have some problems due to deletion of those entries, you could reinstall entries.

iobit-uninstaller-uninstalled-program-logs

Final

IObit Uninstaller is really powerful tool to boost your computer although; it is very simple and small. I believe that it will satisfy your expectations. If you have some problems like that, don’t lose it.

Bye for now!


Read more

Monday, January 2, 2012

Image Resizer: Resize All Pictures by Right Clicking

0

If you work with pictures, sometimes you need to make them smaller or bigger size. It is very hard to make them smaller or bigger one by one. You could install some programs to solve this problem, but every extra program makes your computers’ performance slower. I would like to suggest a tool place in your right click menu for resizing all pictures or image files in one click. Image Resizer is a simple, small and useful tool to solve your problem. Please, click here to download this tool. It is only 1003 KB tool.

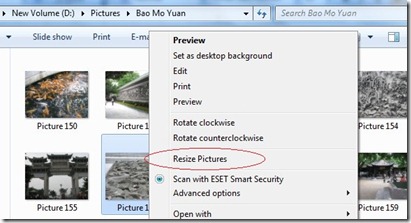
image-resizer-on-right-click-menu

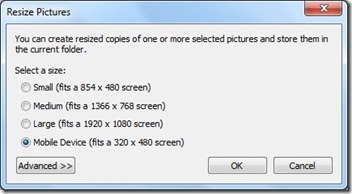
After you setup the tool, Image Resizer will placed on your mouse right click menu. You should only select image files or pictures and click right button on your mouse. Click Resize Pictures on the right click menu and see the Image Resizer interface. It is a very simple interface that you could use it easily.

image-resizer-simple-settings

You could select resizing options suggested by Image Resizer or you could click advanced button and use your own settings. The tool saves files in the same folder with original files. If you want, you could keep original files or replace with the original file. If you have landscape and portrait image files together in the same folder, choose portrait and landscape pictures separately. Otherwise, you could have some problems with the image files.

image-resizer-advanced-settings

Image Resizer is very useful and simple tool that solve your image resizing with only one click. Please write your comments about this tool, if you use it.

Bye for now

Read more

Soluto: Boost Your Computer Boot Time

0

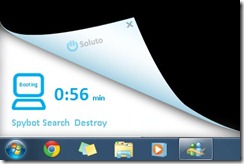
imagesDo you think your computer takes a long time for booting? You tried to remove programs startup, but is it still the same, right? Today I offer software to manage your computer’s startup. It is very simple program to improve your Windows’ boot time. The program’s name is Soluto. Soluto is a simple and useful tool that it evaluates your computer genome and makes you enable to change some settings for improving boot time. Click here to download the program firstly.

After you setup Soluto, you should restart your computer to make Soluto evaluate your system.

soluto-boot-check

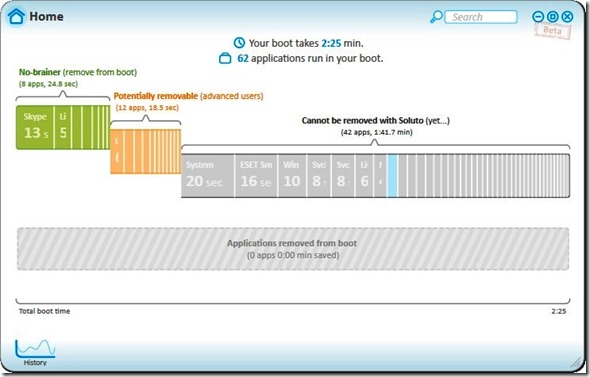
You could see Soluto’s welcome screen. It has very cute and interface. After Soluto finish evaluating your computer, you will see a chart programs placed your computer boot. You could see that my boot takes 2 minutes 25 seconds, and there are 62 programs running in my boot. I want to say, Oh my God! Fortunately, I have Soluto and I will decrease my boot time.

soluto-boosting-software-first-scan

You could see 3 categories on the bar. No-Brainer (remove from boot), Potentially Removable (for advanced users) and cannot be removed with Soluto (yet).

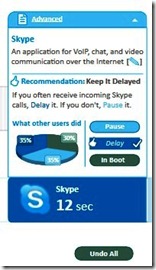
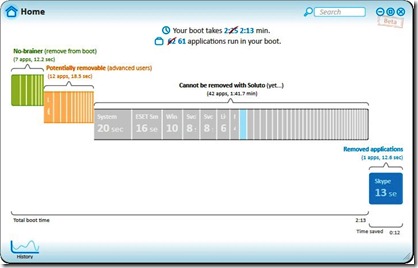
When you click the green bar, you could see no brainer category that you could disable or delay the program if you want. For example, Skype takes 12 seconds in my boot and I want to delay it. If you want to start Skype yourself, you could click disable. I use Skype for my work and I delayed it. It will be opened by itself after several second, if you delay it. If you press disable, you should start it yourself. I earned 12 seconds in the first stage. You could check all programs placed in the green bar, you could disable or pause. Soluto also provide statistics what other users do. 35% of users delayed Skype, 35% of users disable Skype and 30% of users keep Skype in their boot. Online statistic tool is highly appreciated.

soluto-put-application-delaysoluto-boost-your-computer

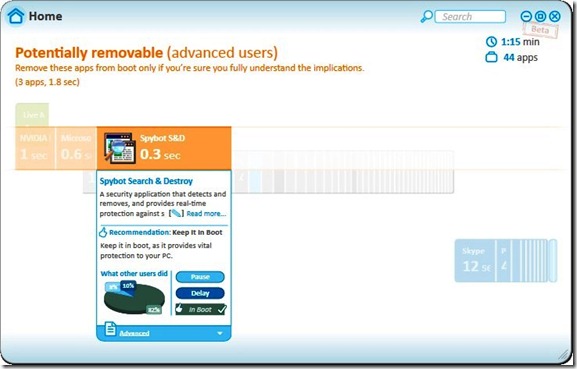
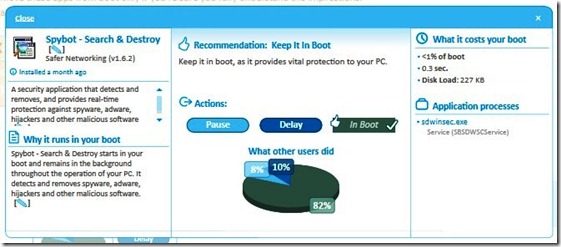
To remove a program from Potentially Removable section could be problem if you don’t know what should you do. For example, I clicked Spybot S-D and I see statistics from other users. 82% of users keep it in startup. If you need more information about the program or provide information about it, you could click advanced button and see more information about it.

soluto-application-info-screen

soluto-app-info-screen

Soluto’s one of the best features is user contribution. Users can write explanation about programs or provide information about solutions for some crash problems. If you like, you could write your explanations to share with the other users. We cannot remove any program from the grey section. Your windows need those file. However, Soluto still researches to find a way to remove some of them.

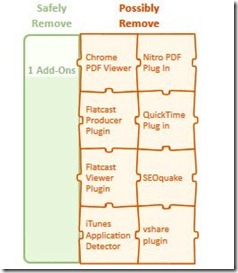
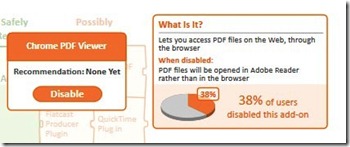
Soluto also have tools for managing your browser add-ons and program crashes. I use Google Chrome browser and see my plugins when I click on Lighten Web Browsers button on main screen. You could see the Safely Remove and Potentially Remove sections and you could see user statistics about add-ons or plugins.

soluto-disable-browser-pluginssoluto-disabling-browser-plugins

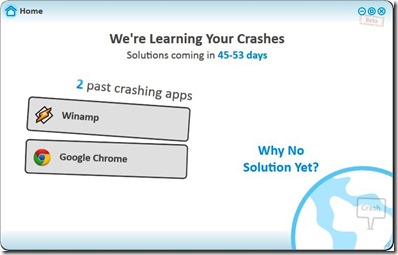
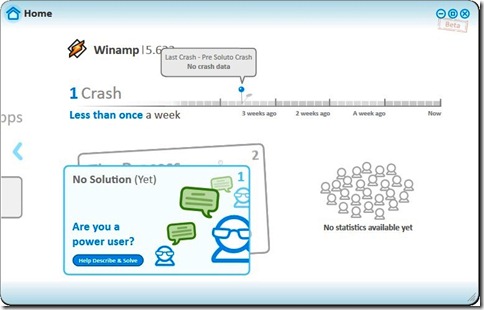
The other tool is to detect program crashes and to find solutions for those crashes. Soluto has detected two crashes on my Google Chrome and Winamp. If you click one of them, you could see information about the crash. You see that, there is not any solution yet. Advanced users who solved this problem can send their comments. If it works, Soluto will share it with all users who have this problem.

soluto-crashes-main-screen

soluto-crashes-screen

You could set Soluto’s adjustment when it placed in system tray. You could start your paused programs. If you don’t do this, your programs will start by itself. You also could adjust PC Readiness monitor seen when you open your computer. You can choose show every boot, show after boot chance, or never show. If you click on My PC Just Frustrated Me, Soluto will check your system and find solutions.

Soluto is highly recommended program to boost your computer’s boot time. This is the program that you will never feel regret to use. Please, share your comments about the program.

Bye for now

Read more

 
This website about music of world does not contain any copyrighted material. Articles about music can not be copied, duplicated, published in a website without permission. World Musics Blog is viewed best by Google Chrome.